MENU
Starting a Business
- Best Small Business Loans
- Best Business Internet Service
- Best Online Payroll Service
- Best Business Phone Systems
Our Top Picks
- OnPay Payroll Review
- ADP Payroll Review
- Ooma Office Review
- RingCentral Review
Our In-Depth Reviews
Finance
- Best Accounting Software
- Best Merchant Services Providers
- Best Credit Card Processors
- Best Mobile Credit Card Processors
Our Top Picks
- Clover Review
- Merchant One Review
- QuickBooks Online Review
- Xero Accounting Review
Our In-Depth Reviews
- Accounting
- Finances
- Financial Solutions
- Funding
Explore More
Human Resources
- Best Human Resources Outsourcing Services
- Best Time and Attendance Software
- Best PEO Services
- Best Business Employee Retirement Plans
Our Top Picks
- Bambee Review
- Rippling HR Software Review
- TriNet Review
- Gusto Payroll Review
Our In-Depth Reviews
- Employees
- HR Solutions
- Hiring
- Managing
Explore More
Marketing and Sales
- Best Text Message Marketing Services
- Best CRM Software
- Best Email Marketing Services
- Best Website Builders
Our Top Picks
- Textedly Review
- Salesforce Review
- EZ Texting Review
- Textline Review
Our In-Depth Reviews
Technology
- Best GPS Fleet Management Software
- Best POS Systems
- Best Employee Monitoring Software
- Best Document Management Software
Our Top Picks
- Verizon Connect Fleet GPS Review
- Zoom Review
- Samsara Review
- Zoho CRM Review
Our In-Depth Reviews
Business Basics
- 4 Simple Steps to Valuing Your Small Business
- How to Write a Business Growth Plan
- 12 Business Skills You Need to Master
- How to Start a One-Person Business
Our Top Picks
How to Manage File System ACLs With PowerShell

Table of Contents
Managing permissions on files and folders can be an enormous time drain for IT professionals. Users have home folders; departments have proprietary folders; projects have unique folders — it goes on and on. Not everyone should have access to every folder, so permissions are crucial.
Fortunately, PowerShell modules can streamline and automate permission management to save time and improve your organization’s access control practices.
Scripting languages like Microsoft PowerShell improve permission management efficiency and accuracy while making routine tasks simpler and more reliable.
Changing ACLs for folders and files
There are three stages involved with changing access control lists (ACLs) for files and folders with PowerShell. This is similar to the three-stage process you’d use to remotely invoke applications with PowerShell.
The three stages are outlined below.
1. Getting the current ACL
Before you can change an ACL, you must first access the existing one. There are two ways to do this with PowerShell:
- Use the Get-Acl
- Use the GetAccessControl()
Many programmers recommend the GetAccessControl() method. Get-Acl is handy; however, due to some limitations, it’s not quite as smart as GetAccessControl(). For this reason, we’ll show you how to get the current ACL using the GetAccessControl() method.
Here’s how it works:
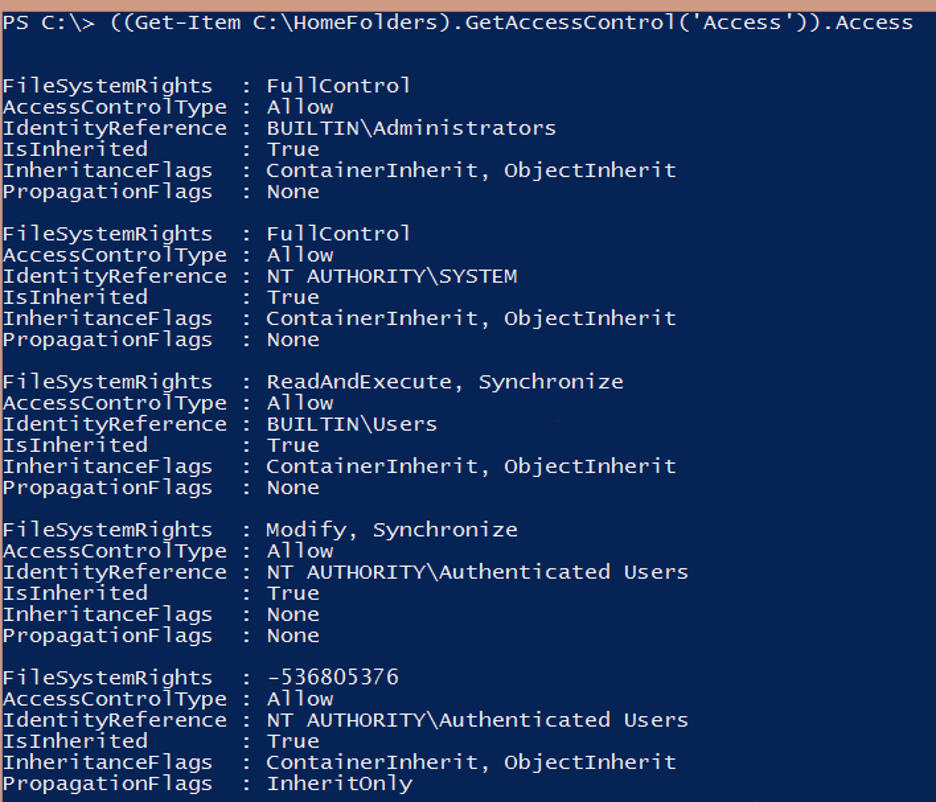
You now have the code to find the ACL in a single folder. Next, expand this to find ACLs for all home folders. If you use Get-ChildItem and the Directory parameter to exclude files instead of Get-Item, you can find ACLs on all home folders:
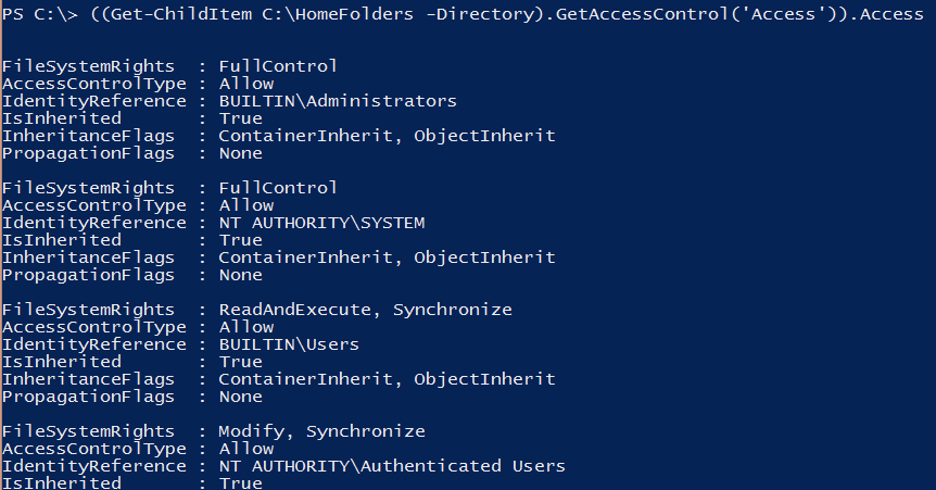
When writing your script, test it first in a single folder. If it behaves the way you want it to, expand it to more folders with confidence.
2. Modifying the ACL
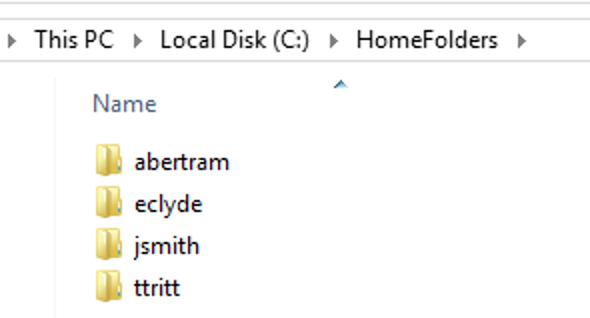
The next step is modifying the ACL on each folder. You must ensure that the owner of each home folder is the only user with access to their folder. Luckily, the folder owner is also the folder name, which makes checking permissions easy.
You’ll need to grab that folder name and use it to create another entry in the ACL. Unfortunately, the script will have to get a little more complicated:
$HomeFolders = Get-ChildItem C:Homefolders -Directory
foreach ($HomeFolder in $HomeFolders) {
$Path = $HomeFolder.FullName
$Acl = (Get-Item $Path).GetAccessControl(‘Access’)
$Username = $HomeFolder.Name
$Ar = New-Object System.Security.AccessControl.FileSystemAccessRule($Username, ‘Modify’, ‘ContainerInherit,ObjectInherit’, ‘None’, ‘Allow’)
$Acl.SetAccessRule($Ar)
Set-Acl -path $Path -AclObject $Acl
}
Pay particular attention to the following line in the script — it can be more challenging to comprehend:
$Ar = New-Object
System.Security.AccessControl.FileSystemAccessRule($Username, ‘Modify’, ‘ContainerInherit,ObjectInherit’, ‘None’, ‘Allow’)
3. Setting the new ACL
Access control entries (ACEs) are the individual rights inside an ACL. An ACE can also be called a FileSystemAccessRule. This is a .NET object that has five parameters;
- Security identifier ($Username)
- The right (Modify)
- Inheritance settings (ContainerInherit,ObjectInherit), which force all folders and files underneath the folder to inherit its new permissions.
- Propagation settings (None). This parameter means nothing will interfere with the inheritance settings.
- Type (Allow).
The remaining lines take the $Ar FileSystemAccessRule object, add it to the ACL, and commit the ACL back to the disk. The way this script commits is similar to the process of installing Windows patches with PowerShell — another example of how PowerShell is great for system admin tasks.
If you use GetAccessControl() and Set-Acl, you can perform any number of other actions on ACLs, such as adding new ones as explained above, as well as removing old ones or modifying existing ACLs.
The FileSystemAccessRule object in PowerShell is a set of access control rights for users or groups. This is one of a number of .NET objects that PowerShell can interact with.
The benefits of using PowerShell to manage file system ACLs
Using PowerShell to manage file system ACLs has two distinct advantages:
- Saving time. PowerShell streamlines the process of managing file system permissions, which saves you time and headaches.
- Improving security. PowerShell can help you increase business security through access control.
1. PowerShell can streamline the process of managing file system ACLs.
Changing permissions on a single folder is a cinch in Windows:
- Right-click a folder.
- Go to Security.
- Change the folder’s permissions.
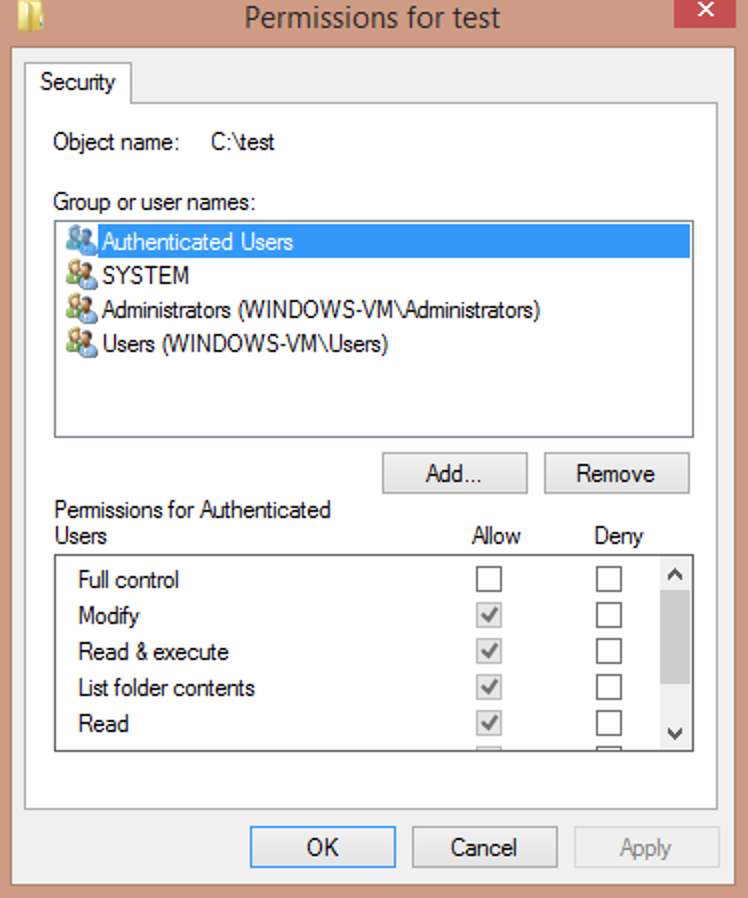
But when you’ve got thousands of folders to change, this process becomes impractical and a huge time drain for IT professionals.
For example, say you have a company file server that houses all employees’ home folders. Each employee must have Modify access to their folder, and administrators must have Full Control over all folders. You may have the server built and all folders created, but you then have the monumental task of ensuring NTFS permissions are set correctly on each folder.
PowerShell automates this process and saves your IT team valuable time.
2. PowerShell permissions can boost your organization’s security.
Ensuring only the right people have access permissions to file servers keeps your IT infrastructure compliant with GDPR and HIPAA. Additionally, it helps protect against data breaches by ensuring the wrong people don’t access your customers’ sensitive data and financial information.
PowerShell can manage file system ACLs to make ensuring correct permissions and protecting your organization’s data easy.
Mark Fairlie contributed to this article.
- PowerShell: Everything You Need to Know

- How and When to Create and Use PowerShell Modules

- From COVID-19 to Hurricane Season: Disaster Preparedness for Small Business

- How to Make Money in Retirement: A Guide to Turning a Hobby Into a Side Business

- Mobile Wallet Guide: Google Pay vs. Apple Pay vs. Samsung Pay


